Copyright © 2005 Michael Rudolf
All rights reserved.
Redistribution and use in source and binary forms, with or without modification, are permitted provided that the following conditions are met:
Redistributions of source code must retain the above copyright notice, this list of conditions and the following disclaimer.
Redistributions in binary form must reproduce the above copyright notice, this list of conditions and the following disclaimer in the documentation and/or other materials provided with the distribution.
Neither the name Michael Rudolf nor the names of its contributors may be used to endorse or promote products derived from this software without specific prior written permission.
THIS SOFTWARE IS PROVIDED BY THE COPYRIGHT HOLDERS AND CONTRIBUTORS "AS IS" AND ANY EXPRESS OR IMPLIED WARRANTIES, INCLUDING, BUT NOT LIMITED TO, THE IMPLIED WARRANTIES OF MERCHANTABILITY AND FITNESS FOR A PARTICULAR PURPOSE ARE DISCLAIMED. IN NO EVENT SHALL THE COPYRIGHT OWNER OR CONTRIBUTORS BE LIABLE FOR ANY DIRECT, INDIRECT, INCIDENTAL, SPECIAL, EXEMPLARY, OR CONSEQUENTIAL DAMAGES (INCLUDING, BUT NOT LIMITED TO, PROCUREMENT OF SUBSTITUTE GOODS OR SERVICES; LOSS OF USE, DATA, OR PROFITS; OR BUSINESS INTERRUPTION) HOWEVER CAUSED AND ON ANY THEORY OF LIABILITY, WHETHER IN CONTRACT, STRICT LIABILITY, OR TORT (INCLUDING NEGLIGENCE OR OTHERWISE) ARISING IN ANY WAY OUT OF THE USE OF THIS SOFTWARE, EVEN IF ADVISED OF THE POSSIBILITY OF SUCH DAMAGE.
Table of Contents
Abstract
This tutorial will guide you through the process of creating a simple installation wizard using jwizz. Each step will be accompagnied by source code and screenshots.
Before you start coding please verify that you have a Java Development Kit (version 1.4 or greater) installed. Sun's JDK can be obtained at http://java.sun.com/j2se/1.4/
Furthermore make sure that you have the latest version of the jwizz library available. If not, download it at http://javaprog.net/jwizz/
For the compiler and the virtual machine to know about jwizz the library has to be added to the classpath. If you don't use an IDE with configurable build and execution environments you can pass command line options to the executables:
java -classpath jwizz.jar InstallWizard
The main class responsible for setting up and starting the
installation wizard will be called
InstallationWizard. Its task is it to create a
model containing the wizard steps, initialize the wizard and position it
on the screen.
import net.javaprog.ui.wizard.*;

public class InstallWizard {
    public static void main(String[] args) {
        DataModel data = new DataModel();

        WizardModel model = new DefaultWizardModel(new Step[]{
            new WelcomeStep(),
            new LicenseStep(),
            new LocationStep(data),
            new FinishStep()
        });

        Wizard wizard = new Wizard(model, "Installation Wizard",
            new ImageIcon("computer.gif"));

        wizard.pack();
        wizard.setLocationRelativeTo(null);
        wizard.setVisible(true);
    }
}
The DataModel instance can later be used to
query the installation location selected by the user.
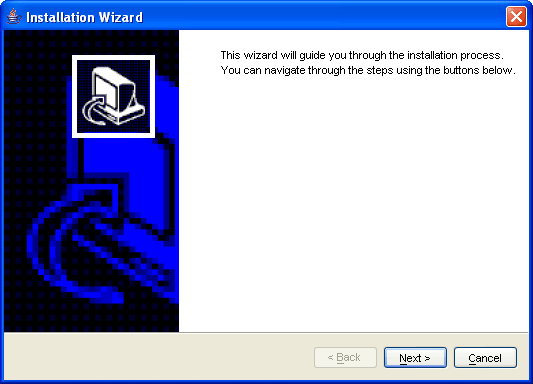
The first step shown to the user when the wizard ist started
displays an explanatory welcome message. The super call in the constructor
passes the step name and description to the
AbstractStep superclass which implements most of
the methods in the Step interface. While
the createComponent method returns the
JComponent instance actually being displayed, the
prepareRendering method is not needed here and is
therefore empty. Be aware that we will leave out the required import
statements in the listings below.
import javax.swing.*;
import net.javaprog.ui.wizard.*;

class WelcomeStep extends AbstractStep {
    public WelcomeStep() {
        super("Welcome", "This is the Installation Wizard");
    }

    protected JComponent createComponent() {
        JPanel stepComponent = new JPanel();
        stepComponent.add(
            new JLabel("<html>This wizard will guide you through the installation process.<p>"
                + "You can navigate through the steps using the buttons below.</html>"));
        return stepComponent;
    }

    public void prepareRendering() {}
}
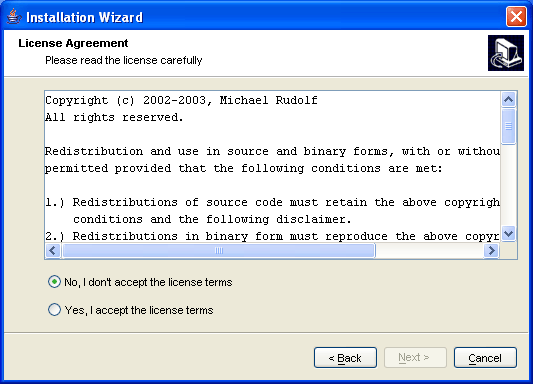
This step covers an elementary part of installation procedures: it shows a license and requires the user's agreement before continuing. The license text is displayed inside a text area with scroll bars. Below that are two radio buttons for approval respectively disagreement of the license. The buttons are grouped so that only one can be selected at a time.
class LicenseStep extends AbstractStep {
    protected JTextArea licenseArea = new JTextArea();

    public LicenseStep() {
        super("License Agreement", "Please read the license carefully");
    }

    protected JComponent createComponent() {
        JPanel stepComponent = new JPanel(new BorderLayout(0, 10));
        stepComponent.add(new JScrollPane(licenseArea));

        final JRadioButton noRadioButton = new JRadioButton(
                "No, I don't accept the license terms", true);
        final JRadioButton yesRadioButton = new JRadioButton(
                "Yes, I accept the license terms");

        ButtonGroup group = new ButtonGroup();
        group.add(noRadioButton);
        group.add(yesRadioButton);

        JPanel choicePanel = new JPanel(new GridLayout(2, 1, 0, 5));
        choicePanel.add(noRadioButton);
        choicePanel.add(yesRadioButton);
        stepComponent.add(choicePanel, BorderLayout.SOUTH);
        return stepComponent;
    }
}
In order to be able to react to the button clicks we register an action listener with them. The wizard's "Next" button is enabled and disabled accordingly.
ActionListener buttonListener = new ActionListener() {
    public void actionPerformed(ActionEvent e) {
        setCanGoNext(e.getSource() == yesRadioButton);
    }
};
noRadioButton.addActionListener(buttonListener);
yesRadioButton.addActionListener(buttonListener);
Finally, because the disapproval button is selected by default, the
wizard's "Next" button has to be disabled. In the
prepareRendering method we read in the license
from a file line by line and fill the text area with. This should actually
be done in the createComponent method because
that is only called once in contrast to the
prepareRendering method which is invoked each
time the step is displayed (i.e. also when the user navigates backwards).
However, for the sake of readability we put it here.
public void prepareRendering() {
    try {
        BufferedReader reader = new BufferedReader(
            new FileReader("LICENSE"));
        String line;
        while ((line = reader.readLine()) != null) {
            licenseArea.append(line + "\r\n");
        }
        reader.close();
    } catch (IOException ioe) {
        ioe.printStackTrace();
    }
    setCanGoNext(false);
}
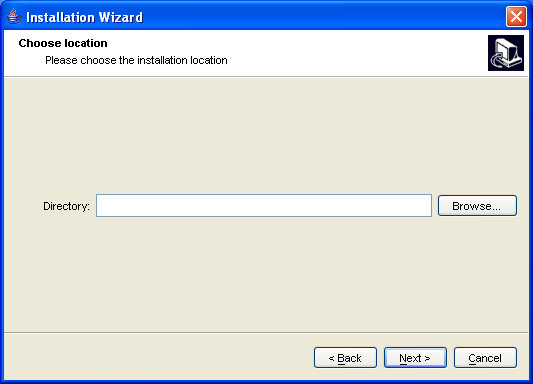
Choosing an installation location is a common task for users.
Therefore we show an input field together with a browse button. Due to the
BoxLayout used we need to specify a maximum height
for the panel.
class LocationStep extends AbstractStep {
    protected DataModel data;
    protected JTextField fileTextField = new JTextField();
    protected JFileChooser fc = new JFileChooser();

    public LocationStep(DataModel data) {
        super("Choose location", "Please choose the installation location");
        this.data = data;
    }

    protected JComponent createComponent() {
        fc.setFileSelectionMode(JFileChooser.DIRECTORIES_ONLY);
        final JPanel stepComponent = new JPanel();
        stepComponent.setLayout(new BoxLayout(stepComponent, BoxLayout.Y_AXIS));
        stepComponent.add(Box.createVerticalGlue());
        JPanel inputPanel = new JPanel(new BorderLayout(5, 0));
        inputPanel.add(new JLabel("Directory:"), BorderLayout.WEST);
        inputPanel.add(fileTextField);
        JButton browseButton = new JButton("Browse...");
        inputPanel.add(browseButton, BorderLayout.EAST);
        inputPanel.setMaximumSize(new Dimension(Integer.MAX_VALUE,
                inputPanel.getPreferredSize().height));
        stepComponent.add(inputPanel);
        stepComponent.add(Box.createVerticalGlue());
        return stepComponent;
    }

    public void prepareRendering() {}
}
When clicking the browse button a directory chooser dialog should be displayed and the text field has to be updated to show the user's selection.
browseButton.addActionListener(new ActionListener() {
    public void actionPerformed(ActionEvent e) {
        if (fc.showOpenDialog(stepComponent) == JFileChooser.APPROVE_OPTION) {
            fileTextField.setText(fc.getSelectedFile().getPath());
        }
    }
});
In order to work with the chosen directory afterwards we attach the
text field to an instance of the DataModel class
using an identifyer string. The default implementation of the
DataLookup interface only requires an
object and a method to invoke it together with the parameter array.
Method method = null;
try {
    method = fileTextField.getClass().getMethod("getText", null);
} catch(NoSuchMethodException nsme) {}
data.registerDataLookup("location",
        new DefaultDataLookup(fileTextField, method, null));
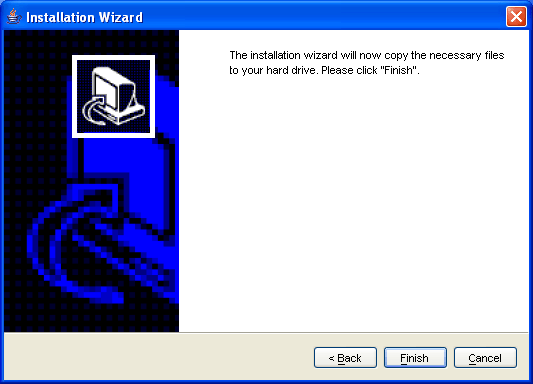
The last step in the sequence is similar to the welcome screen: a simple text is shown informing the user of the further proceedings. Additionally we enable the "Finish" button.
class FinishStep extends AbstractStep {
    public FinishStep() {
        super("Finish", "The installation will now be started");
    }

    protected JComponent createComponent() {
        JPanel stepComponent = new JPanel();
        stepComponent.add(
            new JLabel("<html>The installation wizard will now copy the necessary files<p>"
                + "to your hard drive. Please click \"Finish\".</html>"));
        return stepComponent;
    }

    public void prepareRendering() {
        setCanFinish(true);
    }
}
You might have already asked yourself where the actual installation
work, such as creating directories, copying files, etc., is done: whenever
the wizard is finished or canceled, all instances of
WizardModelListener registered with the
wizard's model are notified. Thus, in order to perform the installation
you have to create a listener and attach it to the model. In our case only
the method wizardFinished needs to be
implemented.
WizardModel model = ...;

model.addWizardModelListener(new WizardModelListener() {
    public void wizardFinished(WizardModelEvent e) {

    }

    public void wizardCanceled(WizardModelEvent e) {}
    public void stepShown(WizardModelEvent e) {}
    public void wizardModelChanged(WizardModelEvent e) {}
});

Wizard wizard = ...;